|
1. Introduction 2. Installation 3. Usage 4. GPL cameras explained (by Edwin Solheim) 5. History, Bugs & Fixes, To-Do-List 6. Thx! 7. Legal stuff |
|
1. Introduction |
|
Editing the track-cameras of GPL is not easy. One reason is the format of
cameradata. A lot of work has been done to investigate all the values and
units and still there are some unknown, although they do not seem to be
important at all. The other reason is, that there is no particular software especially written for editing this files. Brian Heiland made his famous CarCAMEditor, which is very useful and fits all needs of car-camera-editing. But for the track-cameras, no such program existed yet. Of course, you could use Paul Hoad's Trackeditor, but in its current state, which seems not to be developed any further, it is far from being a real help (sorry, Paul, but that is my opinion. I am not saying that your efforts were not great. But you did quit too early :-( .). So, when I started trackediting some time ago, I quickly came to the point where editing the camerapositions was inevitable. And because of the lack of having a suitable program for this task, I started to code one of my own. TrkCAMEdit is the result. To top of page |
|
2. Installation |
There are two ways to install TrkCAMEdit on your computer, depending on what is already installed on it.
After everything is setup properly, a doubleclick on TrkCAMEdit.exe will fire up the program. At the first launch, there will be a pop-up-window that complaints about a missing configuration-file. Don't worry about that, just click "OK" and you are ready to do some editing ;)! NOTE: The complete setup-program associates *.cam-files with TrkCAMEdit, so that doubleclicking a *.cam-file in the explorer will open the file in TrkCAMEdit. However, if you didn't use the setup-program, you can associate *.cam-files manually by right-clicking on one of them and choose the "Open with..."-option. Browse through the following menu until you can mark "TrkCAMEdit.exe". Check the option "Always open with this application" and click "OK". From then you will have this same functionality. To top of page |
|
3. Usage |
After having been started, the program will look like this: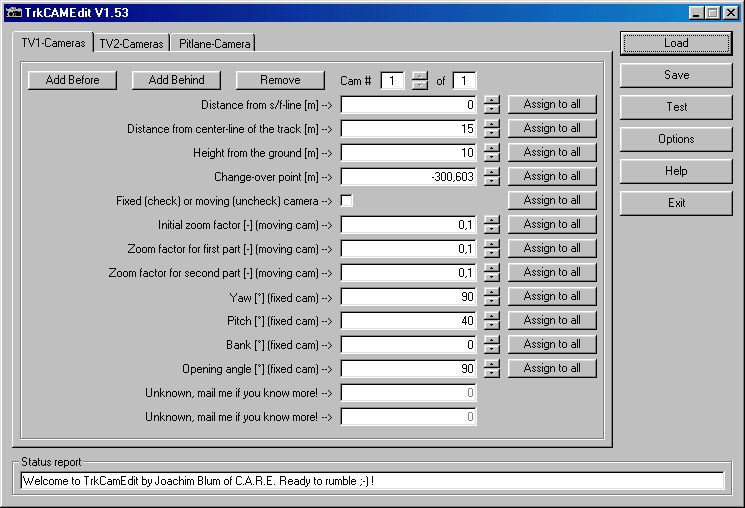 (Point and/or click into the image to get further information!) The tabstrip: Here you can switch between the camerasets TV1 and TV2 and the pitlane-camera. TV1 and TV2 could hold a maximum of 256 cameras each, whereas the pitlane-camera is always one single cam. However, the maximum amount of cameras seems to be 124, according to Jesse Laakso, who found out that when the 125th camera is added, all TV2-cameras are messed up by GPL (at least at the Nurburgring). Back to the main screen image To top of page The "Add before"-button: Click on this button to add a camera before the currently one shown. The new camera will have its values set to the default values specified in the options dialogue. If the maximum of 256 cameras has been reached, this button will become non-functional unless you remove one or more cameras. Back to the main screen image To top of page The "Add behind"-button: Click on this button to add a camera behind the currently one shown. The new camera will have its values set to the default values specified in the options dialogue. If the maximum of 256 cameras has been reached, this button will become non-functional unless you remove one or more cameras. Back to the main screen image To top of page The "Remove"-button: Click on this button to remove the currently shown camera. If only one camera is left, this button will become non-functional unless you add one or more cameras. Back to the main screen image To top of page The "Current Cam #"-field: Shows the current camera-number. This affects only the camera's place within the *.cam-file, not its position along the track. Back to the main screen image To top of page The up-/down-arrows: Use the up-/down-arrows to browse through all available cameras. You can also click into the "Current Cam #"-field and type in the number of the camera you want to go to. Back to the main screen image To top of page The "Total # of cameras"-field: Shows the total number of cameras in the set. This number cannot be directly edited. To add or remove cameras, use the appropriate buttons. Back to the main screen image To top of page The "Load"-button: Opens the standard Windows file-dialogue for loading. Only GPL-track-cam-files can be loaded. Back to the main screen image To top of page The "Save"-button: Opens the standard Windows file-dialogue for saving. Back to the main screen image To top of page The "Help"-button: Opens this helpfile in the standardbrowser. Back to the main screen image To top of page The data fields: Here you can see and edit all data of the currently selected camera. If you want to change a value, simply click into the appropriate textfield and type in the number you want. The program will automatically check the syntax of your entry. If it does not understand what you typed in, it will give a short message in the status line and discard your input. However, the program will not check if your input was logically correct. For example, if your track has an overall length of 4 km an you enter 5000 as number for value #1 (see chapter 4 for an explanation of all values), then TrkCAMEdit would accept the input, but GPL hardly would. With V1.5, I limited the inputs to reasonable sizes. See chapter 4 for details. One last remark: Because of the input-checking the program will update its internal variables only if the data field where the input was undertaken looses the input-focus. So to be sure that your entry has been recognized by the program, hit the tabulator-key afterwards or click somewhere else. Back to the main screen image To top of page The value-up/down-arrows: If you want to change cameravalues in small steps, use these instead of typing in the whole number again. Back to the main screen image To top of page The "Assign to all"-buttons: By clicking on one of these buttons, you can quickly assign the corresponding value of the current camera to all cameras in the current set. Back to the main screen image To top of page The status line: If something is going wrong or everything is doing fine, the program will give you a short message here. I included this textfield mostly for debugging purposes. Back to the main screen image To top of page The "Test"-button: Launches GPL and, according to the settings here, plays a scripted sequence of mouseclicks. Useful for testing the cameraset. This button will only be enabled if a correct path to GPL is set here. Back to the main screen image To top of page The "Options"-button: Opens the options dialogue of TrkCAMEdit which is divided into three sections: "General", "Editing" and "GPL remote". Back to the main screen image To top of page "General"-options: 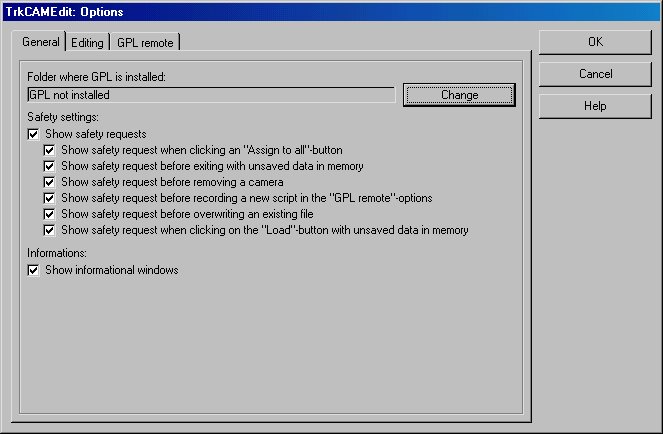 (Point and/or click into the image to get further information!) The GPL-folder selection: If the string "GPL not installed" is displayed here, you will not be able to use the "GPL remote"-feature of TrkCAMEdit. Click on the "Change"-Button to tell TrkCAMEdit where GPL is installed on your machine. This will lead you to the dialogue below:  Select the GPL folder from this dialogue. The "OK"-button will stay disabled out until TrkCAMEdit finds the file "gpl.exe". Click on "OK" to save the path or click "Cancel" to return without a selection. Back to the general options dialogue Back to the main screen image To top of page The safety options: Here you can adjust the nag-factor of TrkCAMEdit ;). Back to the general options dialogue Back to the main screen image To top of page The informational option: Another anti-nag-setting. Back to the general options dialogue Back to the main screen image To top of page "Editing"-options: 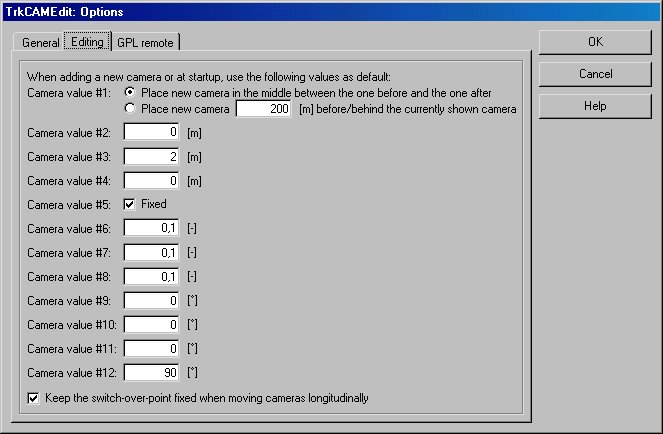 (Point and/or click into the image to get further information!) Default cameravalue #1: This defaultvalue has two different settings. If the first one is activated, TrkCAMEdit will calculate the value so that the new camera is placed exactly in the middle between the camera before and the camera after. For instance, if you have one camera at 100m and a second camera at 200m and you put one inbetween, it will have 150m as the first value. If the current camera is the only one in the set or if there is no possibility to to calculate the average distance (for instance when you click on "Add before" while the first camera of the set is displayed) then TrkCAMEdit will behave like if the second option was activated. If the second option is activated, you can enter a value in the textfield and that will be the distance a new camera is placed from the one that is currently displayed. If you click on "Add before", the value in the textfield will be substracted and when you click on "Add after", it will be added to the value of the current camera. Back to the general options dialogue Back to the main screen image To top of page Default cameravalues #2 - #12: Click into the textfields and enter a value. Pretty much the same as on the main screen. Back to the general options dialogue Back to the main screen image To top of page The "Fixed switch-over point"-option: This one is very useful if you have determined a perfect switch-over point (for example a tight turn) and want to experiment with the cameravalue #1. Check this option to let TrkCAMEdit make the necessary adjustments to value #4 for a fixed switch-over point when you change value #1. Back to the general options dialogue Back to the main screen image To top of page "GPL remote"-options: 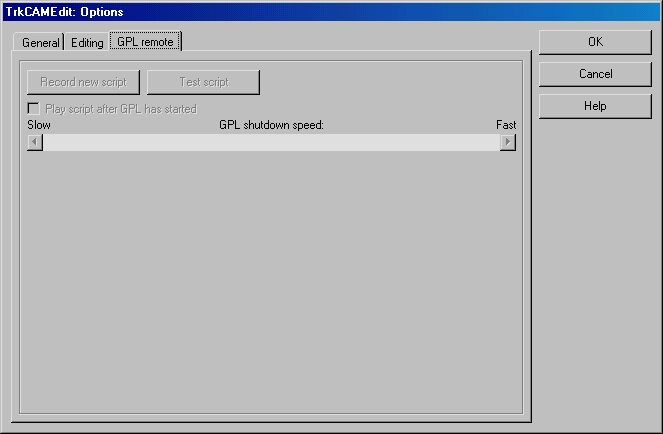 (Point and/or click into the image to get further information!) This feature lets you remote control GPL by a recordable series of mouseclicks. It's very useful because you often want to check what picture your edited camera produces in GPL. Attention! Unless I find a better solution, there is one restriction that has to be made for it to work properly: The resolution in GPL must be set to 640x480! Sorry about this but it's currently inevitable. The "Record new script"-button: This button will only be enabled if a correct path to GPL is set here. A click on it launches GPL and then records a sequence of maximum 256 mouseclicks. Every successful recorded click will be confirmed by a beep of your pc-speaker. To stop the recording, press F5 while being either on the playback screen or in the main menu of GPL. GPL will be shut down automatically. The recorded sequence will be played back when you click the "Test"-button on the main screen and have this option enabled. The idea behind all this is to remote control GPL in order to quickly test your edited camera set by one single click on the main screen. I give you a little example: Before you start editing, I recommend to drive a not too fast lap around the whole track and save the replay. When in TrkCAMEdit and after having set up the path to the right GPL-installation (I suggest making a separate installation for editing purposes), click on the "Record new script"-button. GPL will be launched. After the splash screen the main menu of GPL appears. Click on "View replay". In the replay screen, click on the previously recorded one-lap-replay (click on the slider-bar if necessary, but don't slide it down, because only clicks are recorded, no drag-movements!) and then on the green button. After the replay has been loaded, wind it to the point you want and hit the "Play"-button. Stop the recording by pressing F5. GPL will automatically shut down. You can now playback this sequence whenever you click on the "Test"-button on the main screen. Edit a camera, save the *.cam-file and then let TrkCAMEdit do all the stupid work for you. GPL will fire up, all the mouseclicks will be performed and you can watch the replay without having to navigate through the menus. After the last mouseclick has been played, a beep announces that TrkCAMEdit waits for you to press F5. If you do so, TrkCAMEdit will shut down GPL and you can immediately continue with editing. Hints for recording: - Click slowly: Press the button down, hold it down just a few microseconds longer than usual and then let it go. - Listen to the pc-speaker. - Click exact, especially when you choose the replay that has to be played. Click in the middle of that small row. - Test the recorded script by clicking on the "Test sript"-button. If the script does not behave like you expected (most errors happen during the selection of the replay-file), record it again. - And don't forget: Set the resolution of GPL to 640x480! Back to the GPL remote options dialogue Back to the main screen image To top of page The "Test script"-button: This button will be disabled as long as no script has been recorded. Click to test your recorded script. Back to the GPL remote options dialogue Back to the main screen image To top of page The "Play script..."-option: This option will be disabled as long as no script has been recorded. If it is checked, the recorded script will be played when clicking the "Test"-button on the main screen. If it is unchecked, a click on the "Test"-button will only launch GPL. Back to the GPL remote options dialogue Back to the main screen image To top of page The "GPL shutdown speed"-slider: When pressing F5 after a script has been played back, TrkCAMEdit will send all the necessary keystrokes to shutdown GPL. Depending on the speed of your computer, the length of the loaded replay and some other factors, this sequence can be accelerated. With this slider you can control the speed of the keystrokes. The more to the right, the faster the keystrokes will be sent. Play a little with this setting until you find the maximum setting for your machine. On my computer (Athlon 600, V3-3000), I can set the slider to about 1/8 from the right end which results in a GPL shutdown from playback screen to the desktop in about 1 second ;). Back to the GPL remote options dialogue Back to the main screen image To top of page The "OK"-button: Closes the options dialogue and saves all changed settings. Back to the options dialogue Back to the main screen image To top of page The "Cancel"-button: Closes the options dialogue and rejects all changed settings. Back to the options dialogue Back to the main screen image To top of page The "Help"-button: Opens this helpfile in the standardbrowser. Back to the options dialogue Back to the main screen image To top of page The "C.A.R.E"-button: Opens the C.A.R.E-homepage in the standardbrowser. Check out for updates or other hot GPL-stuff! Back to the main screen image To top of page The "Exit"-button: Formats all your harddrives, makes your wife pregnant, crashes your car and kills the dog. Guess what? ;) Back to the main screen image To top of page |
|
4. GPL cameras explained (by Edwin Solheim) |
|
a small guide written by Edwin Solheim, with additional information by Teppo Lehtonen and Jesse Laakso, adapted for TrkCAMEdit and brought to HTML by Joachim Blum. Version 1.2 - 2001/01/26 TV1- and TV2-camerasets: Camera value #1: Camera position argument #1 - The distance the camera is located from the start-/finish-line of the track in meters. TrkCAMEdit limits this value to between 0 and 50000. Camera value #2: Camera position argument #2 - The distance the camera is located from the defined center-line of the track in meters. A positive value puts the camera on the left side of the track and a negative value puts the camera on the right side. NB: I say center-line and not center of the track, because at some tracks the defined center-line and the center of the track are not always the same. Edit a camera located at the start-/finish-line at Monza and set value #2 to "0" and you will see what I mean. TrkCAMEdit limits this value to between -200 and 200. Camera value #3: Camera position argument #3 - The height the camera is located from the ground surface in meters. TrkCAMEdit limits this value to between 0 and 200. Camera value #4: Camera change-over point - Value (meters) tells the GPL "director" when to switch over from the previous camera to this one. In other words: When the car is within this distance from the camera position, then the camera will be activated. A negative value activates the camera before the car reaches the camera position, a positive value activates the camera after the car has passed the camera position. TrkCAMEdit limits this value to between -10000 and 10000. Camera value #5: Camera-type - a "0"-value means that the camera will follow the car and a "1"-value will lock the camera. Setting the value to 1 makes GPL use camera values #9 to #12 for zoom and picture location. More about this later. In TrkCAMEdit, simply check or uncheck the option to choose between these two camera-types. Camera value #6: Camera zoom #1 - Initial carsize value. This is a kind of "zoom" the camera will use when it is activated. This value is not used by fixed cameras. It has no unit. It is a multiplier for the size of the car in the picture. When setting it to 1, the car will exactly fill out the picture when looking at it from straight ahead or behind. TrkCAMEdit limits this value to between 0.001 and 10. Camera value #7: Camera zoom #2 - Carsize value for first part. This is a kind of "zoom" the camera will use from the time it is activated until the car reaches the camera position. This value is not used by fixed cameras. It has no unit. It is a multiplier for the size of the car in the picture. When setting it to 1, the car will exactly fill out the picture when looking at it from straight ahead or behind. TrkCAMEdit limits this value to between 0.001 and 10. Camera value #8: Camera zoom #3 - Carsize value for last part. This is a kind of zoom the camera will use from the time the car passes the camera position until the switch-over to the next camera. This value is not used by fixed cameras. It has no unit. It is a multiplier for the size of the car in the picture. When setting it to 1, the car will exactly fill out the picture when looking at it from straight ahead or behind. TrkCAMEdit limits this value to between 0.001 and 10. Camera value #9: Fixed camera focus orientation #1 - Yaw. This value tells GPL where to point fixed cameras at. A positive value will point the camera to the left in relation to its position and a negative value will point it to the right. A "0"-value will point the camera to the "east"-direction of the global coordinate system of the track. The original unit is radians, however, TrkCAMEdit uses degrees for this value. TrkCAMEdit limits this value to between -360 and 360, which is one complete rotation in either direction. Camera value #10: Fixed camera focus orientation #2 - Pitch. This value tells GPL where to point fixed cameras at. A positive value will rotate the camera downwards in relation to its position and a negative value will rotate it upwards. The original unit is radians, however, TrkCAMEdit uses degrees for this value. TrkCAMEdit limits this value to between -360 and 360, which is one complete rotation in either direction. Camera value #11: Fixed camera picture orientation - Bank. Tells GPL what way to rotate the picture (i.e landscape or portrait like). A positive value will rotate it clockwise and a negative value will rotate it counterclockwise. At 180 degrees the picture will be upsidedown. The original unit is radians, however, TrkCAMEdit uses degrees for this value. TrkCAMEdit limits this value to between -360 and 360, which is one complete rotation in either direction. Camera value #12: Fixed camera POV. This value sets the opening angle (or otherwise: the zoom) for fixed cameras. The lower the value the more it will zoom-in. The original unit is radians, however, TrkCAMEdit uses degrees for this value. TrkCAMEdit limits this value to between 0 and 360. Camera value #13: Not used. Camera value #14: Not used. As you can see, it seems like the moving cameras only use values #1 to #8 while fixed cameras use values #1 to #5 and #9 to #12. Because of this, TrkCAMEdit will disable the not used values according to the setting of value #5 (checked or unchecked) as kind of a "hint" for the user. As of now I do not know what values #13 and #14 are for, they all seem to be set to "0" for all cameras at all tracks. Pitlane camera: The pitlane-camera uses completely different values than the TV1- and TV2-camerasets. So far this is what I know about it: Camera value #1: Camera position #1 - longitudinal position in meters from the center of the whole track (that means, the center of the global coordinate system used). TrkCAMEdit limits this value to between -50000 and 50000. Camera value #2: Camera position #2 - lateral position in meters from the center of the whole track (that means, the center of the global coordinate system used). TrkCAMEdit limits this value to between -50000 and 50000. Camera value #3: Camera position #3 - height above track/surface in meters. TrkCAMEdit limits this value to between 0 and 200. Camera value #4: Pitlane-camera focus orientation #1 - Yaw. Similar to value #9 for the fixed cameras. A positive value will point the camera to the left in relation to its position and a negative value will point it to the right. A "0"-value will point the camera to the "east"-direction of the global coordinate system of the track. The original unit is radians, however, TrkCAMEdit uses degrees for this value. TrkCAMEdit limits this value to between -360 and 360, which is one complete rotation in either direction. Camera value #5: Pitlane-camera focus orientation #1 - Pitch. Similar to value #10 for the fixed cameras. A positive value will rotate the camera downwards in relation to its position and a negative value will rotate it upwards. The original unit is radians, however, TrkCAMEdit uses degrees for this value. TrkCAMEdit limits this value to between -360 and 360, which is one complete rotation in either direction. Camera value #6: Pitlane-camera picture orientation - Bank. Similar to value #11 for the fixed cameras. Tells GPL what way to rotate the picture (i.e landscape or portrait like). A positive value will rotate it clockwise and a negative value will rotate it counterclockwise. At 180 degrees the picture will be upsidedown. The original unit is radians, however, TrkCAMEdit uses degrees for this value. TrkCAMEdit limits this value to between -360 and 360, which is one complete rotation in either direction. Camera value #7: Pitlane-camera POV. Similar to value #12 used for the fixed cameras. This value sets the opening angle (or otherwise: the zoom). The lower the value the more it will zoom-in. The original unit is radians, however, TrkCAMEdit uses degrees for this value. TrkCAMEdit limits this value to between 0 and 360. Camera value #8: This value is 0 on all original Papyrus camfiles, so better leave it with this value. Camera value #9: This value is -0.125 on all original Papyrus camfiles, so better leave it with this value. Camera value #10: Not used. Camera value #11: Not used. Camera value #12: Not used. That is about all I know at the moment. If you got any additional information that I have missed or maybe other explanations then please feel free to drop me a line or 3. The address is as always: ed@gplea.org Hope this helps a few souls out there and that you all have a good time editing new tracks and cameras! All the best, Edwin Solheim The GPLEA www.gplea.org Well, it helped me a lot! Thanks for that, Ed! To top of page |
|
5. History, Bugs & Fixes, To-Do-List |
|
If you encounter bugs then please report them to: webmaster@joachimblum.de Please include the *.cam-file (if any) with which the bug showed up. Also, a brief description of what happened would help a lot (this means that mails like "I cannot get this �$%#&! to work!" do not really help). To-Do-List Note: This list is not about what is to come, but what I want to do. It is much likely that most of the listed stuff will never make it to reality! - Full graphical UI with interactive trackmap. - N4-support. - 3D-preview of the camera's picture. - Smarter remote control routines ;). 2005/10/04 - As requested by Nigel Pattison, this little update makes TrkCAMEdit usable for new tracks that don't have the original GPL limitations in tracklength and overall number of cameras. - This update is only available as single executable. See paragraph 2 for more information. - Version number is 1.54. 2001/07/04 - Stefan Sigwarth found that the input checking for value #3, which didn't allow for negative values, was too restrictive. This caused a runtime error when loading the camera file of Spa. Fixed. - Removed the button that linked to the C.A.R.E.-homepage because it no longer exists :(. - Removed also the C.A.R.E.-section in this file :((. - Some minor changes which mean absolutely nothing to you. - Version number is 1.53. 2001/02/08 - Dirk Wagner found some quirks in the setup-program. Hopefully fixed ;). - Now *.cam-files can be opened by doubleclicking on them. See section 2 for details. - Version number is 1.52. 2001/02/01 - Jesse Laakso found out that the pitlanecam-values #1 and #2 didn't accept negative numbers. Fixed. - On some systems there are still problems with one missing DLL. I found a workaround and have updated section 2 with this subject. Nevertheless I'll try to find a better solution. - Version number is 1.51. 2001/01/28 - Stefan Magnusson found out that the input limitation on the values #9 - #11 caused a runtime error with some original Papyrus *.cam-files. Fixed. - There were two broken links in this helpfile. Fixed. - Some beta-testers reported that TrkCAMEdit refused to work due to missing DLLs. Therefore I decided to offer TrkCAMEdit in a second package which comes with a complete setup-routine and all necessary runtime-files. I also updated section 2 of this manual with the issue. - Version number is 1.5. 2001/01/26 It's been some time since the last update but I think it was worth it ;). A lot of new features made it into this version which will be the first public release. But let's see what I have done: - Added up/down-arrows for every camera-value. Thanks to Jesse Laakso for the idea. - Added "Assign to all"-buttons for every camera-value in the TV1-/TV2-sets. Again, thanks to Jesse Laakso. - Added a whole new options dialogue and a new kind of configuration-file which is much easier to handle (at least from the programmer's point of view). - Added the possibility of creating default values for added cameras. - Added the possibility of remote controlling GPL for camera-testing purposes. Thanks to Stefan Magnusson for the basic idea. - Revamped this online helpfile, especially sections 3 and 4. Thanks to Jesse Laakso, who pointed out a mistake in the description of TV1-/TV2-value #9. Special thanks to Teppo Lehtonen who found out what the TV1-/TV2-values #6, #7 and #8 really do and who unveiled the last secrets of the pitcameravalues. - Some minor internal improvements. - Added "To-Do-List" to this section. - Version number is 1.5. This release is for the public. Finally! 2000/11/17 - Phil Flack pointed out a bug. He was unable to run TrkCAMEdit because GPL wasn't installed on his system and he couldn't leave the initial dialogue which asks for the GPL-folder. Oops ;). Fixed. - Version number is 1.01. Program still is not for the public! 2000/11/16 - Reprogrammed the load- and save-dialogues to more comfortable ones: Windows-standard ;). - Added *.cam-filter to the load- and save-dialogues. - Removed "save as"-button because of unnecessarity. - The program asks now for your GPL-folder when it is launched for the first time and writes the path into a file "TrkCAMEdit.ini" within the program-folder. It also remembers the last opened folder in the load- and save-dialogues. - Corrected the tabstop-indices: Now you can comfortably browse through all data-fields in a line from top to bottom. - Added lots of tooltips. Just point on an element and remain there for a moment and a little explanation will pop up ;). - Version number is 1.0. BETA-status has been canceled. Program still is not for the public! 2000/09/25 - Edwin Solheim discovered that the backspace-key did not work in the data fields. This was because of my rigorous input-checking routine ;). Fixed. - Ed also suggested a field indicating the total number of cameras in every set. Included. - Dirk Wagner found out that it would be better if one could directly "jump" to a camera by entering a number in the "current camera"-field instead of clicking all the way through. Included. - On some systems, the program would not run and give the following error message: "Component TABCTL32.OCX or one of its dependencies not correctly registered: a file missing or invalid". Obviously, the VB6 runtimes are not as complete as they should be. This problem can be fixed by downloading and installing the necessary DLLs. See "Installation"-section of this helpfile for details. - Version number is 0.7 BETA. 2000/09/24 - Because of a bug in the code, TrkCAMEdit did not convert the values #3, #5, #6 and #8 of the pitlane-camera from radians to degrees and back. Fixed. - Along with some minor changes to the helpfile-structure, I added this "History, Bugs & Fixes"-section. - Version number is 0.6 BETA. 2000/09/22 - First release of TrkCAMEdit for C.A.R.E-members only. - Program is nearly complete with full online-help. - Version number is 0.5 BETA. 2000/09/14 - Added tabstrip to switch between TV1, TV2 and pitlane. - First screenshot is presented to C.A.R.E-members. 2000/09/13: - A breakthrough! Ed Solheim provides me with his guide of the camera fileformat. 2000/09/11: - V0.1 runs for the first time. It can read *.cam-files and show all values. However, interpretation of the values is still not possible because of a lack of information. 2000/09/06: - Project started! To top of page |
|
6. Thx! |
|
I have to thank all of these people without whom this program would not have
been finished ever: - Edwin Solheim and Phil Flack of the GPLEA for valuable information of the camera-dataformat and for beta-testing. - Greger Huttu for additional information, for beta-testing and for being so fast ;). - Jesse Laakso for additional information, for beta-testing and for his good ideas. - Teppo Lehtonen for additional information and beta-testing. - Stefan Magnusson for beta-testing, ideas and his version of a trackcameraeditor (look into the "utilities"-section). - Martin Granberg and Jonas Matton for the GPL Replay Analyzer and beta-testing. - Martin "donL" Kronhofmann for beta-testing, the Crashmania and too much other things to be mentioned here. - Rainer "Pedalguru" Kreutzer and Klausi "16:9" Wember for beta-testing and lapping me during our CAR-races ;). - All members of C.A.R.E for beta-testing, especially Andreas Peter for the fast graphics. - All GPLlers out there for being the f***ing best community ever! - My lovely wife Erika for being so patient with me and my hobby. I love you! To top of page |
|
7. Legal stuff |
|
TrkCAMEdit is copyright (C) 2000 by Joachim Blum of C.A.R.E. The software is provided "as is". In no event shall I, the author, be liable for any consequential, special, incidental or indirect damages of any kind arising out of the delivery, performance or use of this software. This software has been written with great care but I do not warrant that the software is error free. You may not attempt to reverse compile, modify, translate or disassemble the software in whole or in part. You may freely give copies of TrkCAMEdit to others, as long as the software is unmodified. You may not change a single bit, you may not exclude any files or add any to the package and you may not make TrkCAMEdit part of another package. You may not charge any money for the copying and/or distribution of TrkCAMEdit, also not for TrkCAMEdit itself. To top of page |
|
This document is (c) 2001, Joachim Blum. All rights reserved. |